Sunday 17 June 2012

final evaluation


For my Self Directed Project I wanted to take something which really challenged me in skill and knowledge as well as professionalism and time management. Throughout the Self Directed Project unit I have constantly questioned myself. What is my path in costume? What are my skills? But most importantly after my accident, how can I contribute to the team?
 Originally I started this project on the costume store where I was making a historic men’s shirt. This garment really made me appreciate the time and effort which goes into each stage of production. Once I studied the shirt I thought it would be fairly simple like the one I worked on previously for Battle for the Winds however I soon found this was not the case.  At every turn a new issue came to light, such as when making the placket on the shirt I had to make sure I didn’t trim too far into the shirt otherwise the placket would sit at an angle or that the pleats in the shoulders were in the correct area. Dexter, our lecturer, was very strict on our timings, the cleanliness of our fabric and the process we used to make the shirt.  Two of these points were easy to work with as I was always the first into the workroom each morning and three of us worked together on the process of the shirt to complete the correct sequence. However on the second day of making I turned up to class and found a pink mark on my white fabric, as we were working in the old wet materials room this was not a surprise and we ended up placing sheets of white paper over our desks to prevent any more stains. It was decided that the spot on my shirt could be ignored however I was very disheartened by this; I learnt that caring for your garments is essential to maintain their condition and that they should not be left unattended.  I was also upset that I was not able to complete the shirt however am planning on finishing the garment once I can use a sewing machine again.

During the Easter holidays I broke my arm in two places meaning sewing became an issue as well as many other tasks within costume store.  Once I spoke to our year tutor I was accepted to work as a textiles assistant on the Breathe project. My tasks would include making garments that did not require a sewing machine as well as assisting on others garments which needed added textile work. As soon as I arrived I was set to work on base costumes which each person would be wearing. I had to dye each garment, paint into the fabric and then apply a mixture of white acrylic paint, pva glue and sand into various patterns to give the costumes the impression they had been on the beach for some time.  After doing this for several days it became quite tedious and I found the work rather repetitive, I felt a bit useless as whilst everyone else could work on the machines or do the major dying I could only do the smaller parts of the garments. From this I learnt patience as once these were complete the work on the group outfits could begin.  It was also during the group outfits I found the area of the team I could work well in as well as be useful. During Wednesday evenings the Breath Together club ran and I taught barnacle and base costume workshops where groups of first years and volunteers worked together. It was wonderful knowing others could learn something from me as well as I from them.  As well as this I found learning new techniques worthwhile. I found I could use a crochet hook one handed and that if I used various stitches with it I could make the beards for the elders. This was quite an achievement for me as I was able to do this without help and accomplish an actual garment which could be used within the performance. As well as this I was able to help others by making ties for cloaks, bracelets for the builders and textural pieces for other garments.
Though in the beginning I was quite sceptical working on breathe, it has taught me that textile and fabric manipulation is something I would like to continue with into the third year as well as looking into teaching as a career. I feel I have learnt a valuable skill set from this project and working as part of a team has taught me that everyone has their own areas of specialty, if combined it can amount to an amazing project, maybe breaking my arm was one of the best things that could have happened. 

Friday 15 June 2012

Builders overalls

thick straps of twine, string and wool plaited and chain stitched

thick straps of string and wool plaited
 and chain stitched 
 All of this week I have been working on the Builders, making sure there all prepared and adding the final braidings onto the overalls. This has become an interesting problem solving task as I have to find a way of making each different but tie in together. So far I have used a combination of wool, string and twine. Each has been crocheted with various hooks and then either sewn down or plaited/ braided. Come Wednesday I found that it started to get a bit repetitive, however with some ideas being bounced around between the group I found new ways of making the overalls interesting and textural. The smaller pairs of overalls have chunkier straps whereas the larger pairs have long but thin straps. To get around this I used single plaited strings and then sewed them down, though for the thicker straps I had to vary the plaiting and chain stitch. Below are the final results of each. In reflection I wish I had learnt more plaiting techniques which could have been used and maybe used more bolder colours of wools, however I am happy with what I have done. For future reference i must remember to cluster barnicals together, otherwise they look bare.
thick straps of twine, string and wool plaited, woven and chain stitched

thin straps of twine, string and wool plaited, woven and chain stitched


thick straps of twine, string and wool triple plaited and chain stitched. two different styles

thick straps of twine, string and wool plaited, woven and chain stitched
my wonderful model Libby wearing a final pair


Thursday 7 June 2012

final beards


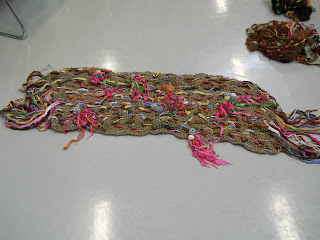
Today I finished the final beard for the elders. as this is the moustache beard the length required was longer than I expected however due to the nature of the stitch the beard can be stretched easily and form to the shape needed. I used the past few days worth of chain stitching and braiding to weave throughout the beard and found my worries about the colours were for nothing.  Each one works well within the beard and combined together are quite striking, however for future reference I will need to combine more braids together for a more textural effect. Using a combination of structured and crochet barnicals has worked well as in clusters not only do they hide the tops of the the seaweed they give a 3d effect to the garment. Overall Im rather pleased with this. My work has come a long way from the beginning of the project and I am finding new ways everyday of working within costume. 3D and textural effects may be something I could look into for my third year.


Wednesday 6 June 2012

balls and balls of wool and thread

Multicoloured chunky
knit wool (1 ball) 


Multicoloured chunky knit wool
(1 ball) double crocheted
Another few days of chain stitch, I have completed enough to finish the final beard. I have used a variety of different wools to bring out the colour of the beard and make the garment visible to the public eye. Once again I have used crochet hooks of different sizes to create numerous lengths of chain. Using the earth colours has meant the beard has been highlighted in the areas needed and has muted the more vibrant colours to fit in with the overall concept needed for the beard. As well as this I experimented with a unique crochet technique where you chain stitch the length of the ball and then go over it again to create a chunky woven effect which looks like it has the texture of rope (see left). Along with this I have tried crocheting with embroidery threads. Though unusual , I have found it creates a reflective effect in the sun and draws the eye. originally I used a large 8mm hook and found that it turned limp and frayed, however with a smaller 3mm hook and a tight pull it held and looks like hair plaited. overall Im happy how these have turned out. I shall make my deadline and hopefully have enough left overs to start the builders overalls next week. Below are the final results and the various knits ect.
Dark brown doubled knit wool (1 ball)

Light brown double knit wool (1ball)

Golden brown embroidery thread (1 skein) 

Light brown embroidery thread (1 skein)

Multicoloured chunky knit wool (1 ball) 

Dark brown chunky knit wool (1 ball)

Mahogany brown embroidery thread (1 skein)

Light grey embroidery thread (1 skein)

Monday 4 June 2012

more wool ....... ball by ball


 Today came another day of chain stitch for the final beard. I have chosen to use various sea colours and rustic colours pallets as well as size knits and crochet hooks to make the beard as textural as possible. This will also allow the audience to see the garments from a distance. 

Another 3 balls of wool were made up: 

  • A lilac double knit using a 4mm crochet hook. This took quite a few hours to make up as the hook was rather small, the wool however was wonderful to work with no splitting or fluffiness and hardly any weight to it meaning it will keep the garment lighter for the person wearing it.

  • Then two multicoloured balls of wool: earth colours with purple using a 6mm crochet hook and sand hues and purple ball of indie wool using a 8mm crochet hook. Both were once again quick and simple to work with. The knots were tight and will fill up the holes in the scarf though like the others if the knots get loose it will turn slightly fluffy due to the make up of the wool.  Admittedly I do feel the sand hues with the chunkier knit will work well within the colour scheme, though the earth hues are the ones I feel I'm taking a risk with. though wonderful in a ball of wool I'm hoping it will blend in with the other colours I plan on using with the beard. That being said i shall evaluate this when ive worked on all the balls of wool and placed them together


Sunday 3 June 2012

final beard prep

I am back to knitting again using another type of stitch called a double loop stitch. This stitch will allow me to weave chunkier types of wool through the scarf/beard without tugging on the stitch. This being the last beard I really want to put everything I have learnt into it and take the best bits from each piece ive made so far. I predict it will take a few days to make it the length needed for the model. Once done I shall weave the various chain stitching throughout the entire scarf, however unlike the others there will be fringing at both ends. I have until Thursday 7th of June to make sure all the beards are up to scratch for fittings.