Wednesday 30 January 2013

Several rows later and it is taking shape.

Continuing on from where I left off, I found that the basic vest was finished with all 3 sections on one knitting needle.I knitted across all the stitches, making 92 stitches to join all three segments together. I have noticed that the garment is beginning to get heavy on the wrists. Using the Nappy Safety Pins have worked well and retained the tension so far, however I shall have to watch the weight and maybe work on a structured surface so that the knit doesn't stretch to much.

The pattern continued as before - knitting one row followed by one row of 3 stitches of knit, purl to the last 3 stitches and knit.  This was continued until it reached my required measurements for the March Hare costume. 
After reaching the required measurement, I needed to shape the arm and front of the waistcoast.  

To do s,o I again followed the basic pattern. Starting of as normal with the knit 3, purl 14, knit 3 and then cast of 6 for under the arm.  The 20 stitches were placed onto a spare 8mm knitting needle or holder as the pattern states.  (I try to have duplicate needles for slipping onto in order to retain the tension, keeping the knitting even).

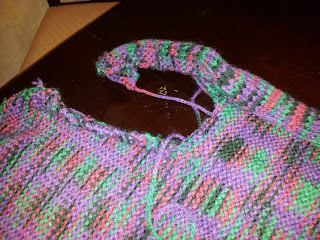
For the back I knitted the first 3, followed by purling 34, knit 3 and then cast of the next 6 for under the arm.  This is now defining the back and the two fronts.

The next 20 stitches are as per the normal pattern of knit 3, purl 14, knit 3 and with the yarn broke, put on a safety nappy pin attached to the back of the right side.  The stitches are then placed on a holder - the other 8mm spare knitting needle.

BACK

With the right side of the knitting facing me I joined the wool and knitted the first row of 40 stitches.  This was followed by the knit 3, purl 34, knit 3 pattern.
This needed to be knitted to about 9 1/2 inches, to form the armhole.

When the required length was reached and finishing on a wrong side, A further 5 rows were knitted and the stitches cast off.

The saved stitches for the right side were put back onto the 8mm needles. Although they were being held on an 8mm needle, for tension purposes, if they had not been put back onto the needle the ongoing knitting would have been totally incorrect and the pattern ruined.

The yarn was joined and I knitted to the last 5 stitches and needed to knit 2 together.  This was the start of the neck line, leaving 3 stitches at the end to knit.
It then went onto a further rows as follows:


Row 2   -   Knit 3, Purl to the last 3 stitches, and Knit 3
Row 3   -   Knit the whole row
Row 4   -   Knit 3, Purl to the last 3 stitches, and Knit 3

and then back onto Row 1 to continue shaping the next line.

This continued until only 14 stitches were left on the needle.  

It took 7 rows of each to get to the correct number of stitches and then to get to the correct length required continued knitting using the 2 main rows of knit the first row, followed by knit 3, purl to the last 3, knit 3.  When the correct length was reached a further 5 rows were knitted and then cast off. This needed more concentration than before and I am pleased that I used the spare 8mm needles to keep the tension right. This has meant that the stretching I have been concerned about has not happened.


Monday 28 January 2013

Work Plan for Week 4


Week 4


Learning 

Personal Development

Monday 28th January
Knitting waistcoat (vest)  
Research fastenings
Work in the arts bar 16.00-21.00
Tuesday 29th January
Knitting waistcoat (vest)  
Write personal blog
Research fastenings
Work in the arts bar 16.00-21.00
Wednesday 30th January
Knitting waistcoat (vest)  
Meeting with Mandy to discuss designs
Disability Mentoring
Work in the arts bar 16.00-21.00
Thursday 31st January
Knitting waistcoat (vest)
Crochet tea pot experimentation
Write personal blog
Work in the arts bar 16.00-21.00
Friday 1st February
Knitting waistcoat (vest)  
Write personal blog

Saturday 2nd / Sunday 3rd   February
Knitting waistcoat (vest)  
Learning agreement and work plan
Research suitable books and journals

Friday 25 January 2013

The Waistcoat, step by step does it


Using the chunky knit, 100% Acrylic, multicoloured wool and 8mm needles,  23 stitches were cast on. The first 3 rows were knitted. The next rows were based around the first row being knit and the second knit 3, purl to the last 3 stitches and then knit until the last three stitches.  This continued until 4 inches had been knitted. The yarn was broken. This can be left to dangle, however I personally find that a nappy safety pin comes in handy to secure the wool on the back of the knitted garment to keep the tension. 

With the free needle I cast on 46 stitches, knitted the first 3 rows and then went into the pattern which was knit one row, and for the 2nd row knit 3, purl to the last 3 and knit 3.  This was repeated until it was the same length as the left front.  Once again, the yarn was broken and secured using a nappy safety pin onto the back of the knitting, which helps secure the tension.  This has started the back of the garment. 

There are now two sections on my knitting needles and am now moving onto the right front.  I cast on 23 stitches and knitted the first 3 rows.This has been followed by a knit row, followed by the next row of knit 3, purl to the last 3 and then knit 3. This continued until it became the same length as the left front and the back.

After 5 days I can honestly say this has been quite a challenge. This is the first garment I have made apart from scarfs and the count for those are equal all the way through. Working to certain measurements has meant a little bit of unpicking and redoing, however the shape of the garment is starting to come together. Within the next few days I feel i can complete this and have it ready to fit on the actress.

Beginning of the waistcoat with broken off wool

Tuesday 22 January 2013

The Waistcoat, you have to begin with the maths

After they joys of learning how to make a tea cup, I have put it aside now my confidence has increased and I have decided to make the knitted waistcoat. I  time tabled myself 2 weeks to complete this garment. As the actors shall not be cast until the 9th February, I have been told to make it for a person size 10-12 as the people auditioning are teenagers. The good thing about wool and knitting with wool is that it shall stretch if needed and also shrink on contact with high heat/steam. I have found a wonderful knitting pattern from Lion Brand and some multicoloured chunky knit wool which was donated to the event which matches the March Hare design. The all-in-one pattern for the vest has been chosen due to its versatility, it is possible to adjust size, length, knitting needles size and different mediums to make the waistcoat. As I needed to mark the pattern for sizing and length, I photocopied the pattern and then wrote in my calculations prior to starting to knit. This shall save time in the long run and hopefully answer any problems which creep up along the pattern. 


Monday 21 January 2013

Tea cup pattern/practice

For the past few days I have started working on the tea cup for the boater hat. This is the first time I have worked with a large 3D form as far as crochet goes. I have decided to work from a pattern I have found on youtube and once I've learnt the basics I shall create my own pattern. I shall use a 6.0mm hook for this pattern as I am using chunky knit wool, however for future reference if double knit is needed I will need to reduce the size of the hook and take the advice of what the wool manufacturer places on the wool bundle.

Link:

http://www.youtube.com/watch?v=MI1mTDapjAw (part 1)
http://www.youtube.com/watch?v=eEWtjdwHbKw (part 2)
http://www.youtube.com/watch?v=FA8-zhcPgRQ   (part 3)


Below are my first attempts of using the pattern. I am thankful that the youtube video shows step by step basics, however I am already noticing part of the pattern which will not work structurally for the hat. I may need to reduce the over all size of the cup so that it stays upright.  I have done 7 rounds so far and predict it will take another 8 on top of this to make the tea cup full size.

Round 1-4 of tea cup

Round 4-7 of tea cup


Work Plan for Week 3


Week 3


Learning

Personal Development

Monday 21st January
Monday Morning Meeting
Crochet teacup practice
Write personal blog
Work in the arts bar 16.00-21.00
Tuesday 22nd January
Knitting waistcoat (vest)  
Write personal blog
Work in the arts bar 16.00-21.00
Wednesday 23rd January
Knitting waistcoat (vest)  
Write personal blog
Disability Mentoring
Work in the arts bar 16.00-21.00
Thursday 24th January
Production meeting
Academic support (investigative studies) 9.00am
Knitting waistcoat (vest)  
Research materials
Write personal blog
Work in the arts bar 16.00-21.00
Friday 25th January
Investigative Study hand in 12.00 am
Write personal blog

Saturday 26th/ Sunday 27th January
Knitting waistcoat (vest)  
Fabric research
Flower experimentation

Write personal blog

Friday 18 January 2013

New Hooks and Tricks

As I am going to be doing a lot of knitting and crochet, I thought it best to become reacquainted with both hooks and needles as well as expend my knowledge. From my previous textural project I learnt basic knitting, circular crochet and single chain crochet. However for this project as we are bringing in a 3D element, I shall have to learn other stitches such as double, treble and amiguri (3D crochet). I shall also have to learn how to follow and adapt a pattern from scratch.

To begin with I needed to get accustomed to working with various size hooks as i already have experience with needles. Each one gives a different sized knit from tight (1.00mm) to very loose (10.0mm +).  I have found that my preferred hook for double knit wool is a 6.5mm has it can hold the chains in place, as well as being loose enough that your not constantly fighting the wool. I do recommend a bottle of hand cream to be put on the side ready for when you have finished as I found my fingers were very red and raw.Below is my practicing chains starting with a 1.00mm hook and finishing with a 10.00mm hook.
Left to Right. 1.00mm-10.00mm


Continuing on from this I used the 6.5mm hook to practice my double and treble stitches. I feel one of these would be suitable to go along the edge of the waistcoat as the fringing. If i could create a stitch big enough I could also add buttons to the outfit and they could be placed through the holes. 

The double stitch has taken me some getting used to due to the complicated sequence that is used to create it. However after several attempts at this I finally produced a significant length of stitches which are at a decent level. However I do believe the treble will be my preferred stitch when coming to the amiguri patterns. The double stitch doesn't hold as well or make the same size holes as the treble. Though it can be used to start of the rows which will help create a flat starting point.


Below is my Treble stitch using the 6.5mm hook. I must admit I do prefer this to the double stitch as it is more adaptable and I do believe that it shall work a lot more on the waistcoat due to the size of the hole compared to the hole size of the double. The buttons that are in mind are quite chunky so that they stand out so will need a larger hole to fit, it may be a case of having 2 trebles in one stitch to make up for the button.

Treble stitch in loop
Close up of treble stitch